Floor Heating Mats:
Step 1: Create a floor plan.
Start off by drawing a floor plan of the heated area on a grid paper. Be sure to precisely measure and indicate all dimensions. The floor plan must indicate the location and dimensions of any furniture and fixed fixtures, such as vanities, cabinets, counters, showers, tubs, toilets, etc. Both HeatTech mats and cable cannot be installed under these fixtures. Clearly outline the heated area with a marker.
Step 2: Calculate the size of heated area.
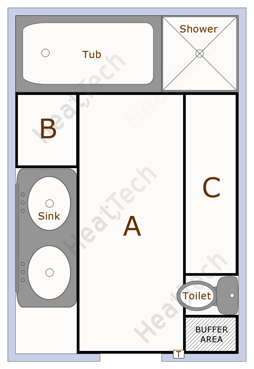
Calculate the overall size of the heated floor by using data from Step 1. Break down the area into smaller portions (squares, rectangles) if needed and add up their individual sizes (A, B & C as shown on sample to the right). Record the results. For 120V mats, the total heated floor area should not exceed 150 square feet. For 240V mats, it should not exceed 300 sq. ft.
As seen on example, all 3 areas - A, B & C are areas where heating is essential. The area just below the sink does not require heating and is therefore, not included in space calculations.
A buffer area (where heating is non essential) shown is recommended, but not mandatory and is therefore left out of space calculations. This area may be used for installing excess radiant heat mat length.
Tip: To calculate the size of a triangle, multiply its sides and divide the result by 2.
Step 3: Determine thermostat location.
Thermostat should be positioned further from locations which may subject it to spraying or splashing by water – such as tubs, showers and sinks. Thermostat location is also important since it determines the starting point of the mat. The example shown indicates thermostat location "T" near the entrance.
Step 4: Draw mat layout on the floor plan.
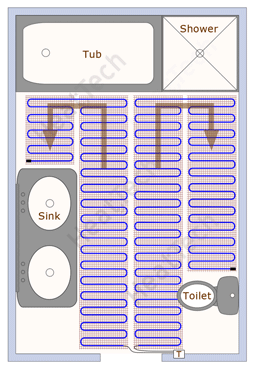
A floor plan is essential in selecting the proper size floor heating mat. Consider that the mat has a constant width of 20”, however, navigating in narrower spaces can be achieved by trimming the fiberglass mesh (Do not cut the heating wire!). Ensure that the heating mat covers essential areas, such as right in front of a shower/tub/toilet and in kickspace under the cabinets. Any adjustments for mat coverage and length should be in areas where heat is not essential, such as behind the door, near walls or behind the toilet. Some areas may require the use of more then one mat and this should also be noted on the layout.
For more information on how to trim and install electric floor heating mats, click here.
Step 5: Select a proper size heating mat(s).
Add up the total length of the radiant heating mat and look up the corresponding length in the table with product specifications. Compare the total mat coverage (in sq. ft) from the table with the size of the heated area from Step 2. It should not exceed the size of the heated floor.
Note: a simpler sizing technique can be used which involves matching the total heated floor space with the available mat sizes. This option, although acceptable, is less accurate and is recommended only for rectangular areas with minimum or no obstacles and turns.
Floor Heating Cable
Step 1: Create a floor plan.
Draw a floor plan of the heated area as described above in “Floor Heating Mats”.
Step 2: Calculate the size of heated area.
Follow the instructions above in “Heating Mats”.
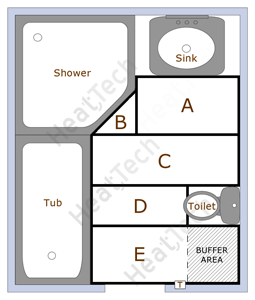
The example shown to the right indicates 5 areas where heating is required: A, B, C, D & E. Buffer area (not part of section "E") is not included in space calculations and used for installation of excess heating cable, if present.
Step 3: Select proper size heating cable.
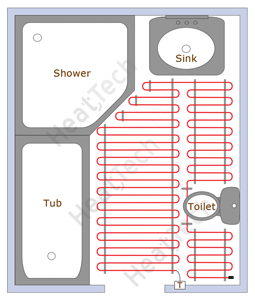
Using the data from product table, select proper length heating cable. Note that cable spacing of 3” is recommended for most installations. The total coverage of the cable at selected spacing should be at or below the size of the heated area. This will ensure that no excess heating cable is left.
For the example shown, the total cable coverage of the heated floor (at 3" spacing) exceeds the heated area, which means that excess cable length will be installed in the buffer area indicated on the floor plan.
Installation tips for both system types:
- It is highly recommended to create a “buffer” area on the floor plan, where heating is not essential and which can be used to run leftover cable or left unheated. Examples of buffer areas are: behind the door, near walls and behind the toilet.
- Skip the tape - duct tape is not recommended for securing the electric floor heating cable since it does not guarantee proper spacing of the cable and may result in insufficient/leftover cable length and uneven heat output. Instead, use HeatTech Cable Guides (HTCG-25). They contain wire hooks spaced at 1”, allowing to runs cable at precisely 2”, 3” (recommended) or 4”. Cable guides are included in every Cable Kit (HTCBLKIT) and additional lengths may be purchased separately.
For assistance with sizing and product selection, contact our design team at support@heattechproducts.com, use our Quote Request Form. Alternatively, you may also browse our floor heating products selection and choose the type which best suits your project requirements.